Unused files
Jump to navigation
Jump to search
The following files exist but are not embedded in any page. Please note that other web sites may link to a file with a direct URL, and so may still be listed here despite being in active use.
Showing below up to 50 results in range #1,051 to #1,100.
View (previous 50 | next 50) (20 | 50 | 100 | 250 | 500)
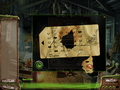
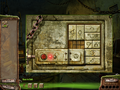
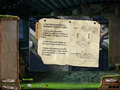
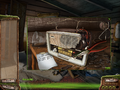 Campfire Legends The Hookman-2009-Puzzle-Bedroom-Radio Solution.png 1,024 × 768; 1.29 MB
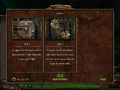
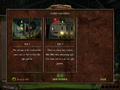
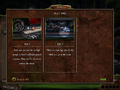
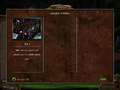
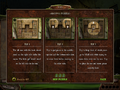
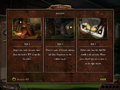 Campfire Legends The Hookman-2009-Puzzle-Bedroom-Radio Tips.png 1,024 × 768; 1.14 MB
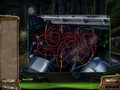
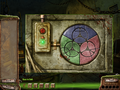
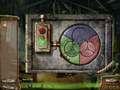 Campfire Legends The Hookman-2009-Puzzle-Boathouse-Circles Solution.png 1,024 × 768; 1.35 MB
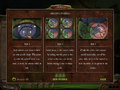
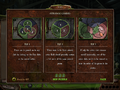 Campfire Legends The Hookman-2009-Puzzle-Boathouse-Circles Tips.png 1,024 × 768; 1.18 MB
 Campfire Legends The Hookman-2009-Puzzle-Boathouse-Decoder Solution.png 1,024 × 768; 1.19 MB
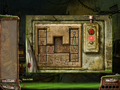
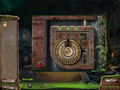 Campfire Legends The Hookman-2009-Puzzle-Boathouse-Door Solution.png 1,024 × 768; 1.36 MB
 Campfire Legends The Hookman-2009-Puzzle-Boathouse-Door Tips.png 1,024 × 768; 1.14 MB
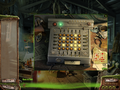 Campfire Legends The Hookman-2009-Puzzle-Boathouse-Punch Card Solution.png 1,024 × 768; 1.3 MB
 Campfire Legends The Hookman-2009-Puzzle-Boathouse-Punch Card Tips.png 1,024 × 768; 1.12 MB
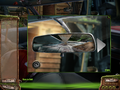 Campfire Legends The Hookman-2009-Puzzle-Car-Mirror Solution.png 1,024 × 768; 1.06 MB
 Campfire Legends The Hookman-2009-Puzzle-Car-Tires Tips.png 1,024 × 768; 1.11 MB
 Campfire Legends The Hookman-2009-Puzzle-Car-Wires Solution.png 1,024 × 768; 1.18 MB
 Campfire Legends The Hookman-2009-Puzzle-Car-Wires Tips.png 1,024 × 768; 1.11 MB
 Campfire Legends The Hookman-2009-Puzzle-Cemetery-Crypt 2-Blocks 1 Solution.png 1,024 × 768; 1.36 MB
 Campfire Legends The Hookman-2009-Puzzle-Cemetery-Crypt 2-Blocks 1 Tips.png 1,024 × 768; 1.17 MB
 Campfire Legends The Hookman-2009-Puzzle-Cemetery-Crypt 2-Blocks 2 Solution.png 1,024 × 768; 1.31 MB
 Campfire Legends The Hookman-2009-Puzzle-Cemetery-Crypt 2-Blocks 2 Tips.png 1,024 × 768; 1.15 MB
 Campfire Legends The Hookman-2009-Puzzle-Cemetery-Crypt 2-Circles Solution.png 1,024 × 768; 1.32 MB
 Campfire Legends The Hookman-2009-Puzzle-Cemetery-Crypt 2-Circles Tips.png 1,024 × 768; 1.18 MB
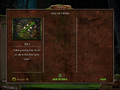
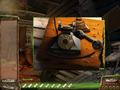 Campfire Legends The Hookman-2009-Puzzle-Living Room 2-Phone Solution.png 1,024 × 768; 1.19 MB
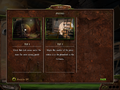 Campfire Legends The Hookman-2009-Puzzle-Living Room 2-Phone Tips.png 1,024 × 768; 1.1 MB
 Campfire Legends The Hookman-2009-Puzzle-Porch-Shutters Solution.png 1,024 × 768; 1.22 MB
 Campfire Legends The Hookman-2009-Puzzle-Woods-Kindling Tips.png 1,024 × 768; 1.14 MB
 Azkend-2009-Screenshot-1.jpg 320 × 480; 71 KB
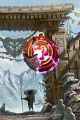 Azkend-2009-Screenshot-2.jpg 320 × 480; 58 KB
 Azkend-2009-Screenshot-3.jpg 320 × 480; 89 KB
 Azkend-2009-Screenshot-4.jpg 320 × 480; 80 KB
 Azkend-2009-Screenshot-5.jpg 320 × 480; 110 KB
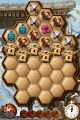
 Toy Monkey-2010-Screenshot-1.jpg 320 × 480; 43 KB
 Toy Monkey-2010-Screenshot-2.jpg 320 × 480; 35 KB
 Toy Monkey-2010-Screenshot-3.jpg 320 × 480; 31 KB
 Toy Monkey-2010-Screenshot-4.jpg 320 × 480; 47 KB
 Toy Monkey-2010-Screenshot-5.jpg 640 × 960; 100 KB
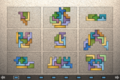
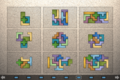
 Zentomino-2009-Puzzle-Page 01 Solution.png 960 × 640; 1.47 MB
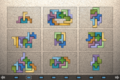
 Zentomino-2009-Puzzle-Page 02 Solution.png 960 × 640; 1.48 MB
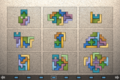
 Zentomino-2009-Puzzle-Page 03 Solution.png 960 × 640; 1.47 MB
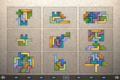
 Zentomino-2009-Puzzle-Page 04 Solution.png 960 × 640; 1.48 MB
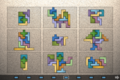 Zentomino-2009-Puzzle-Page 05 Solution.png 960 × 640; 1.48 MB
 Zentomino-2009-Puzzle-Page 06 Solution.png 960 × 640; 1.48 MB
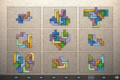 Zentomino-2009-Puzzle-Page 07 Solution.png 960 × 640; 1.48 MB
 Zentomino-2009-Puzzle-Page 08 Solution.png 960 × 640; 1.48 MB
 Zentomino-2009-Puzzle-Page 09 Solution.png 960 × 640; 1.48 MB
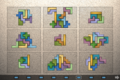
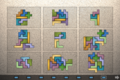
 Zentomino-2009-Puzzle-Page 10 Solution.png 960 × 640; 1.48 MB
 Zentomino-2009-Puzzle-Page 11 Solution.png 960 × 640; 1.48 MB
 Zentomino-2009-Puzzle-Page 12 Solution.png 960 × 640; 1.49 MB
 Zentomino-2009-Puzzle-Page 13 Solution.png 960 × 640; 1.48 MB
 Zentomino-2009-Puzzle-Page 14 Solution.png 960 × 640; 1.47 MB
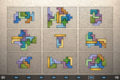 Zentomino-2009-Puzzle-Page 15 Solution.png 960 × 640; 1.48 MB
 Zentomino-2009-Puzzle-Page 16 Solution.png 960 × 640; 1.49 MB
 Zentomino-2009-Puzzle-Page 17 Solution.png 960 × 640; 1.48 MB


